
Do You Really Need That Chair? A Guide
Jan 16, 2019
If you want to create high quality ergonomic solutions that address the main causes to someone’s discomfort, then you definitely want to add root cause analyses to your ergonomic tool kit. No matter if you are a consultant or you manage your own in-house ergonomics program you will surely get major value from implementing this. Why? Well quality and thorough root cause analyses can potentially save you thousands of dollars of wasted time and money purchasing equipment that you don’t really need.
With root causes analyses, the focus of ergonomic assessments shifts from relying on stretching and/or strength-building exercises to the relationships between symptoms and various elements of a person’s workstation. Even with this method, it can get a little confusing at times and there is a risk for those just starting off doing them to feel a little distracted with everything that is going on… see the graphic below.
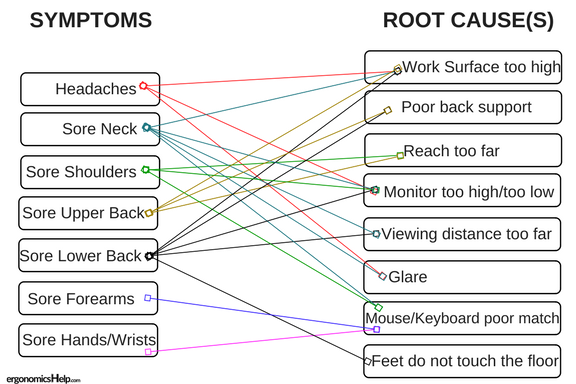
Yikes! For some ergonomic assessments, there are going to be so many interconnected discomfort symptoms that it can feel a little like the graphic above. Other times, the solution is going to be so obvious its going to shine at you like a little golden nugget. There can be a lot of interrelated moving parts to an ergonomic assessment but there is usually one root cause (sometimes there is more) that is the reason why that person is in discomfort. Let’s dive into an example to sort through the potential causes for someone’s lower back pain. Just from referencing the graphic above lower back pain could be a result of a number of different things in the office that could create a ‘perfect storm’ kind of situation. Workstation components that could affect lower back pain include: the work surface being too high, poor back support from the chair/the person leans forward in their chair, the monitor being too high (that could cause that person to lean forward in their chair too), or maybe that their feet don’t fully make contact with the floor. I’m going to tell you exactly how to peel the layers of the onion apart to find out how to actually fix the ergonomics in a workstation.
So, let’s jump into the process that I use.
3 Things To Do For Awesome Root Cause Analyses.
1. Interview That Person first!
The user interview is so important to the ergonomic process because it steers the direction of the ergonomic assessment to where their discomfort is, what may have caused it, and what they think could fix it. Any other concerns about their workstation are documented as well as descriptive info such as if they are right or left handed, work practices and responsibilities and even things like the lens type of their glasses. In a short window of time you basically want to learn as much useful information about that user so you can leverage it to produce a solid root cause analysis later on.
I would typically spend between 5 and 10 minutes getting this information. The interview is also a really good time to tell that person what will be involved with that ergonomic assessment, especially the part where you ask that person to pretend that you are not there. It sounds contrary (of course they will know that you are there looking at their ergonomics) but I’ve found this to be useful otherwise that person could change their position so they score more positive workstation ergonomics. Of course this is nonsense, you are not the ‘ergonomic police’, and you are there only to reduce the ergonomic risk in their workstation (and offer amazing solutions, of course).
I bring this up because this is incredibly key information to develop value-added and personalized root cause analyses.
2. Document The Ergonomic Risk.
The second step is to document where that person’s ergonomic risk is as well as its severity. This is used as the CORE aspect to root cause analyses. I recommend some sort of systematic process to make sure that it is thorough and you don’t forget any steps during the heat of the assessment. In the past I just kind of free handed office ergonomic assessments because I was just never satisfied with any of the office ergonomic assessment tools that I saw on the market. Last year I actually developed my own tool based on the CSA criteria, up-to-date research as well as my own experience doing thousands of ergonomic assessments. I really would have appreciated something like this to guide me through the ergonomic process when I first started doing office ergonomic assessments (but I think the details are for another post).
Whatever route you choose to document the ergonomic risk (free-hand or using a tool) you’ll have to do a combination of postural observations and physical measurements (with a measuring tape). This is to make sure that you are capturing enough data to determine firstly if there is ergonomic risk present in the workstation and then how much of it is there. After capturing the ergonomic risk the next thing that you will have to do is compare it to some standards to figure out if the person’s working positions are within acceptable guidelines and/or if they are severe enough to warrant some sort of action at their workstation.
That leads us to the next step in this process. This is the Root Cause Analysis.
3. The Root Cause Analysis
Years and years ago, before I got into doing office ergonomic assessments my main focus as an ergonomist was in the industrial setting. For most industry related (more heavy and manual type of work) ergonomics, I relied on a solid root cause analysis to tease out what components in a particular job where outside acceptable values and needed to be changed to reduce ergonomic risk. But, for whatever reason I was not yet applying this process to office ergonomic assessments. I think it could’ve been because I thought that office ergonomics wasn’t complex enough to warrant doing root cause analyses although it was clear that the way I was going about my business wasn’t optimal either! It was really a blinding flash of common sense and I immediately incorporated this into my process. What really adds so much value in this process is that instead of focussing just on symptoms of discomfort, in a root cause analysis, you take a good hard look at what is actually causing (or caused) that pain in the first place.
The 5 ‘Whys’
The specific strategy that I use is called the 5 whys. Sounds simple enough. It’s when you go about asking yourself (or the person that you are assessing) WHY 5 times until you reach the root cause of that particular problem. The good thing is that for most scenarios you will not need to ask ‘why’ for the full 5 questions, I’ve found that especially with office ergonomic assessments you’ll get to the main reason for the ergonomic concern in much less time.
Once you get the hang of root cause analyses it can really add a lot of value to your ergonomics process.
Getting to the root cause of the ergonomic problem is essential to an effective ergonomic process and to the identification of appropriate control measures.
To be able to do a really good root cause analysis you’ll have to have a really good grasp on ergonomic criteria. A good strategy that I use during assessments is the simple concept of neutral postures. When I do ergonomic assessments I tell the person that I assess that neutral postures set you up in the most comfortable position to work in – it’s kind of like a lazy boy for the office. It’s a simple way of explaining what an ideal ergonomic set-up is so if anything is outside what is considered neutral, it can quickly be explained in a straightforward way.
Root Cause Analysis: Strategy. Let’s move onto the 4-step strategy that I use when I’m doing ergonomics assessments (Note: I’ll walk you through a thorough example too):
- Identify the ergonomic risks by body part for each task of concern. This would be the summary of the Ergonomics Assessment Tool.
- Cross reference between the user interview and the Results from the Ergonomic Assessment Tool (and any other useful pieces of information that you have on hand) that you use to further decipher the level of ergonomic risk. If any of the measurements do not match the ergonomic criteria (like typical viewing distance) or it is a severe enough posture, then this is usually a good place to start.
- For each risk factor, ask why 5 times until a dead-end is reached and you cannot ask why any more.
- Develop strategies to address the root cause(s) and choose solutions that will substantially reduce the ergonomic risk and be within an affordable cost guideline for the organization.
Here is a simple example of how to apply the root causes analysis process.
Problem:
George works a typical office job – all with a standard workstation layout. He has commented perviously of lower back and shoulder pain that tends to be higher at the end of the day and he can especially feel it on Fridays.
Step 1: Identify the risk factor(s) by body part for each task of concern.
- Neck/Head: No Identified risk factors.
- Shoulders/Upper Back: Raised shoulders* when typing and mousing while doing seated computer work.
- Hands/Wrists: No identified risk factors.
Step 2: Cross-reference between multiple pieces of informaton.
- Direct measurements: The work surface is higher than the user’s seated elbow height.
- Postural Observations: It is observed that the user doesn’t fully use their backrest during computer work. Also, the user’s shoulders are raised when using the mouse and keyboard.
- Interview: Lower back/shoulder discomfort tends to be higher at the end of the day, especially at the end of the work week.
Step 3: Use the ‘5 Whys’. For each ergonomic risk, ask why 5 times, also known as the 5 Whys, until a dead end is reached and you cannot ask ‘why’ any more. Most of the time you do not need to ask why the full 5 times.
- Question 1 (first Why): Why is the user complaining of lower back discomfort? Because they are leaning forward.
- Question 2 (Second Why): Why are they leaning forward?
- Check to see if the work surface is too high for the user. When the work surface (including the keyboard and mouse) are positioned too high above person’s neutral elbow height, people have a tendency to want to lean forward in their chairs to get a better working position.
- Next, check to see if the lumbar support is positioned optimally because if its uncomfortable, people will likely lean forward.
- Lastly, check the monitor height, if the monitor height is positioned too high above a neutral neck posture then the person may want to lean forward or look upwards (with neck extension) to get a better viewing position.
- Check out these three examples of potential scenarios. For this example, it was determined that the work surface was much too high for the user and this is the primary reason why the person is leaving forward in their chair and not using their back support.
- Question 3 (Third Why): Why is the work surface too high for the user? The keyboard and mouse are positioned on top of the desk, which is above the user’s working height.
Step 4: Choose solution(s) that address the root cause(s) of the ergonomic concern. Develop strategies to address the root cause(s) and choose solutions that will substantially reduce the ergonomic risks and be within an affordable cost guideline for the organization. The best strategy is always low cost and high impact solutions. In this case, the work surface is higher than the user’s neutral elbow height. There are a couple of solutions that may work depending on what you and the user discuss of what would likely work best for them. In each of these solutions, you would want to optimize the entire workstation while you are making the primary root cause adjustments too!
- Option 1: Lower desk (or the keyboard tray)
- Option 2: Install a keyboard tray
- Option 3: Raise the person in chair and place footrest below their feet.
So, if we had just purchased that person a brand new shiny chair instead of doing a thorough root cause analysis the ergonomic risk would have NOT been mitigated and it would have come at a cost of a brand new chair (upwards of a thousand of dollars in some cases)… A solid root cause analysis should be core to any quality ergonomic assessment. A person’s discomfort may be a result of several different inter-related things in their workstation yet there is usually one (sometimes more!) primary reason why.
Here’s A Trick.
The trick with ergonomic assessments is not to give all contributors to discomfort equal weight. There is a difference between ‘main’ or primary contributors to someone’s discomfort and other less important or ‘secondary’ causes. If you are not distinguishing these, it can lead to a lot of frustration and overwhelming feelings during ergonomic assessments.
Compare that to the table below.
![]()
In this table the ergonomic assessment is on the left hand side, and the right hand side is a causal analysis.
Let’s give you a bit of background to this scenario.
There is discomfort in both shoulders, with slightly more in the right. The person is right hand dominant and also mouses with the right hand too.
The primary root cause is that the mouse is too far forward. In combination to this, another primary root cause is the work surface is positioned higher than the user’s neutral elbow height.
There is one secondary contributor to the root cause – the monitor is too high and too far forward for the user. This is labelled secondary because craning your neck forward while in extension no doubt will have an effect on overall comfort – but not to the same extent as the main contributors.
Lastly there are 3 tertiary contributors to the reported discomfort. These have even a lesser effect on the user’s discomfort but nevertheless are ergonomic concerns but are still worth noted.
Add This Simple Process To Your Ergonomic Assessments.
I’ll be honest with you… root cause analyses are likely the least sexy thing about office ergonomic assessments, but they do add TONS of value to your process. Whether you choose to add this to your process or not, I hope this post gave you a new way of looking at office ergonomics!